A bright white streak across a watch face, a blown-out label on a skincare bottle, or a window reflection in glassware can make a quality product look cheap online. Knowing how to reduce product glare is not just a lighting skill. It is part of creating ecommerce images that show buyers the product clearly enough to trust what they are buying.
Glare happens when a light source reflects directly into the camera lens. Glossy packaging, polished metal, glass, screens, coated paper, patent leather, and even smooth plastic are all likely to create it. The solution is rarely to use less light. More often, it is about making the light larger, controlling where it falls, and changing the relationship between the product, camera, and light source.
How to Reduce Product Glare With Better Light Placement
The fastest way to reduce glare is to stop pointing a small, hard light directly at the product. A bare flash, small LED panel, or uncovered studio strobe creates concentrated reflections. On a shiny object, that reflection may appear as a distracting hot spot instead of an attractive highlight.
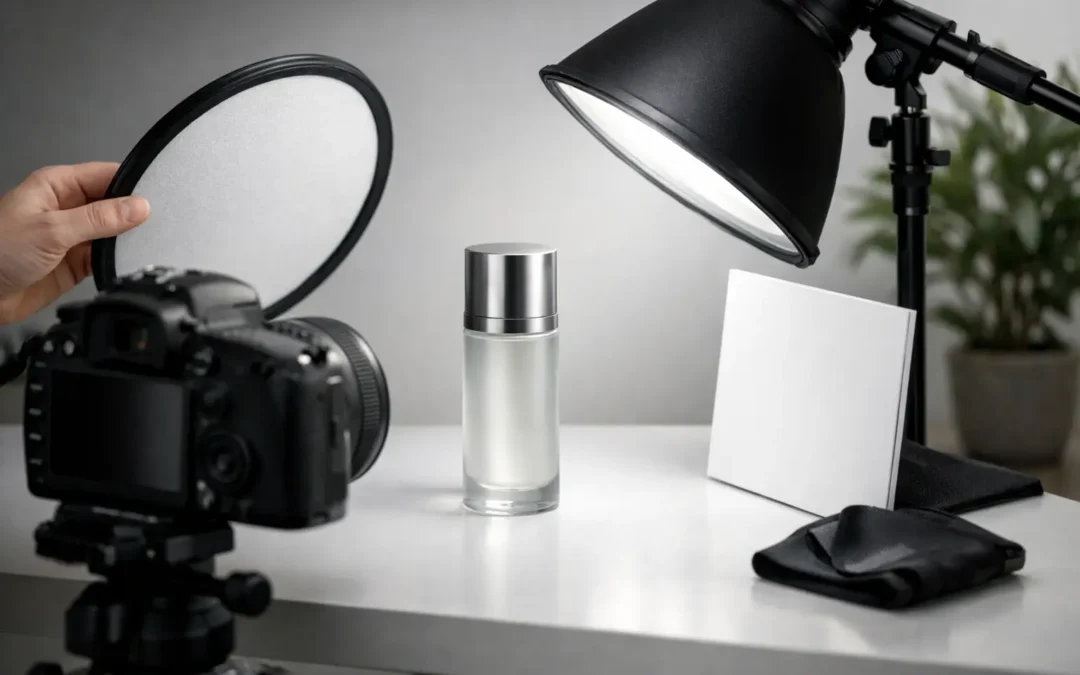
Use a larger light source with diffusion. A softbox, diffusion panel, light tent, or translucent fabric placed between the light and product spreads illumination across a wider area. This produces a smoother reflection with softer edges. For many consumer goods, especially bottles, appliances, beauty packaging, and household products, a large diffused light gives a cleaner, more premium result.
Placement matters as much as modifier size. Move the light off to one side rather than placing it directly in front of the product. Then watch how the reflection moves across the surface. On a glossy bottle, raising the light or shifting it farther to the side can move glare away from the logo. On metallic goods, the goal may be to create a controlled highlight that defines the shape without covering important details.
A useful rule is this: if the camera can see the light source reflected in the product, it can record glare. Change the angle until the reflection falls outside the camera’s view or becomes a deliberate, clean highlight.
Make the Light Bigger, Not Brighter
When a product image looks dark, the instinct is often to increase power. That can make glare worse. Instead, bring a diffused light source closer to the product. A closer, larger apparent light source wraps more smoothly around curved surfaces and reduces harsh contrast.
This is particularly effective for reflective packaging and rounded products. A cosmetic jar, stainless steel tumbler, or glossy sneaker may need a broad reflection to show its form. If the light is too small, it creates a sharp white dot. If the light is too broad, the product can look flat. The best result is usually a controlled gradation from light to dark that gives the item dimension while preserving its actual color and finish.
White foam board can also help. Positioning it opposite the main light reflects soft fill back onto the product, opening dark shadows without adding another direct source of glare. Black foam board does the opposite: it absorbs light and can create darker edge definition on chrome, glass, and polished metal.
Change the Camera Angle Before Changing Everything Else
A small camera adjustment can solve a reflection problem in seconds. When photographing a flat, glossy surface such as a phone screen, book cover, framed item, or label, even a slight tilt can prevent the light from bouncing directly into the lens.
Keep the product’s selling angle in mind. Ecommerce photography needs to be accurate and consistent, so an extreme angle that hides glare but distorts the product is not a real solution. Instead, make minor changes to camera height, distance, or tilt until the reflection moves away from the logo, screen, gemstone, or other key feature.
For products that must be photographed straight on, such as packaged goods or label-forward bottles, adjust the lights first and keep the camera position consistent. A reliable studio setup makes it easier to produce matching images across a full product line.
Use Flags to Control Unwanted Reflections
Reflective products do not only show lights. They also reflect the ceiling, walls, camera, tripod, studio windows, and anyone standing nearby. That is why professional product photographers use flags – black or white boards placed just outside the camera frame to shape reflections.
A black flag is especially useful for watches, jewelry, chrome hardware, electronics, and glass. It can create a clean dark line along an edge, adding contrast and separating the product from a light background. A white card can brighten a dull area or create a deliberate highlight in a dark reflective surface.
Think of highly reflective objects as mirrors with curves. You are often photographing what the product reflects, not simply what you shine on it. Clean surroundings, controlled modifiers, and carefully placed flags can make the difference between a cluttered reflection and a polished commercial image.
Product-Specific Glare Problems Need Different Solutions
There is no single setup that works for every category. The material, shape, finish, and intended use of the image all affect the right approach.
Jewelry and gemstones need bright, controlled highlights to show cut, sparkle, and metal detail. Completely removing reflections can make jewelry look lifeless. The objective is to keep highlights small and intentional while avoiding blown-out metal or dark, distracting camera reflections.
Glassware and beverages often benefit from backlighting or side lighting through diffusion. The challenge is preserving edge definition while keeping labels readable. Reflections from the room can be managed with black flags, while a white background may require separate lighting for the product and backdrop.
Beauty products frequently combine several difficult surfaces in one item: glossy caps, reflective foil, transparent plastic, and printed labels. Light the label for readability first, then refine the highlights on the packaging. If the branding cannot be read at thumbnail size, the image will not work as hard for the listing.
Electronics require close attention to screens, polished bezels, and textured black materials. A screen may need to be photographed at a slight angle, while dark plastic often needs large soft highlights to show its shape. Avoid lighting that turns black products gray unless that brighter appearance is true to the product finish.
Use Polarizers Carefully
A circular polarizing filter can reduce certain reflections, particularly on painted surfaces, plastic, glass, and printed materials. It works by filtering polarized light, and rotating the filter changes the amount of reflection the camera records.
However, a polarizer is not a universal fix. It reduces light reaching the sensor, which may require a slower shutter speed, wider aperture, or more light output. It also cannot remove every type of reflection, especially on bare metal. With screens, polarized light can sometimes create uneven color or dark areas.
For the strongest effect, use a polarizing filter with polarized light sources. This cross-polarization technique is valuable for glossy labels, cosmetics, and some catalog products, but it can remove desirable texture and shine if pushed too far. Test it against the product’s sales goal. A matte-looking image may be technically clean but commercially inaccurate for a premium glossy finish.
Retouch Glare After the Capture, Not Instead of It
Professional retouching can reduce remaining hot spots, clean up small reflections, balance tones, and improve the consistency of a product series. It is especially useful when a reflective item needs to look natural while maintaining clear branding and accurate color.
But heavy retouching should not be used to rescue poor lighting on every image. Rebuilding blown-out labels or removing large reflections from dozens of photos adds time, cost, and risk. It can also make products look overly processed. Capture the cleanest possible file first, then use retouching for refinement.
For marketplace-ready images, accuracy matters. Do not retouch away a true product feature, change a finish from glossy to matte, or alter the color of metallic components. Buyers should receive what the image promises.
Build a Repeatable Setup for Your Product Line
Once you find a glare-control setup that works, document it. Record the camera position, lens, light height, modifier placement, distance to the product, and background settings. This matters for brands adding new colors, sizes, flavors, or seasonal variations over time.
A repeatable system delivers more than a cleaner image. It supports consistent merchandising across Amazon listings, ecommerce product pages, catalogs, paid ads, and print materials. Consistency helps shoppers compare products quickly and makes the brand look established.
For high-volume or difficult reflective products, working with a commercial team such as Product Photography Studio can save significant reshoot time. The right lighting, styling, and post-production process keeps glare under control while protecting the details buyers need to see.
The best product photo does not eliminate every reflection. It uses reflection with purpose, showing the product’s texture, shape, and finish while keeping the label, color, and selling features clear. When buyers can see exactly what they are considering, your images have a better chance to earn the click and support the sale.